


Creating Brightspace Course Components
The following are basic step-by-step instructions provided to assist faculty in starting courses from scratch in Brightspace. In most cases, this order is the most efficient and results in an organized and intuitive course design. These components can be used in various combinations for traditional, hybrid and fully online courses. For more comprehensive design theory and instruction, please consult the CTE online teaching academies in Brightspace at 941-4038. PDF versions of each of these steps is found under each heading. Here is a Complete PDF of Instructions
A complete list of upcoming workshops can be found here.
1. How to Create Announcements
How to Create Announcements in Brightspace
- On the Homepage for a course find the News Widget.

- Click the drop down next to "News" in the News Widget

- Click "New News Item"

- Enter the headline and content for the news item
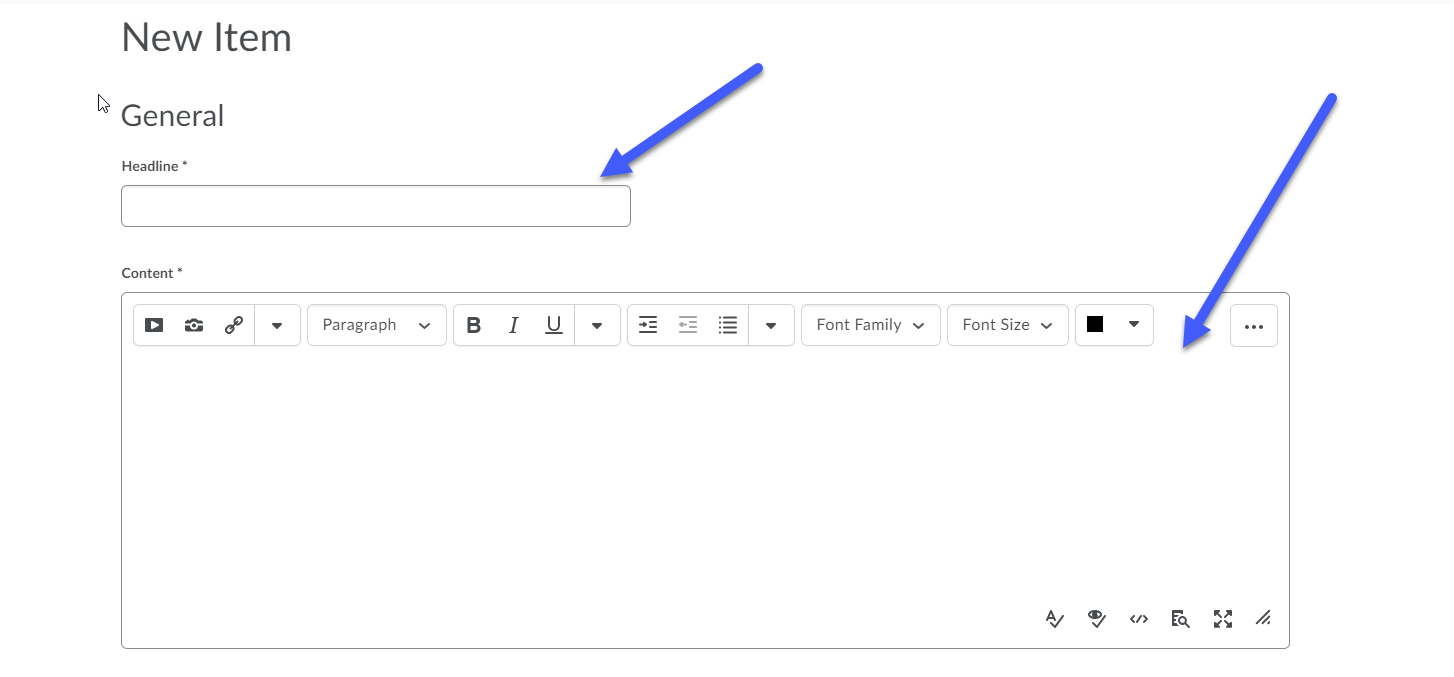
- The start date is the date and time at which the news item will be visible to students. The end date is the date on which the news item will no longer be visible to students. You could also attach files to the news item, or record video or audio to go along with the news item.
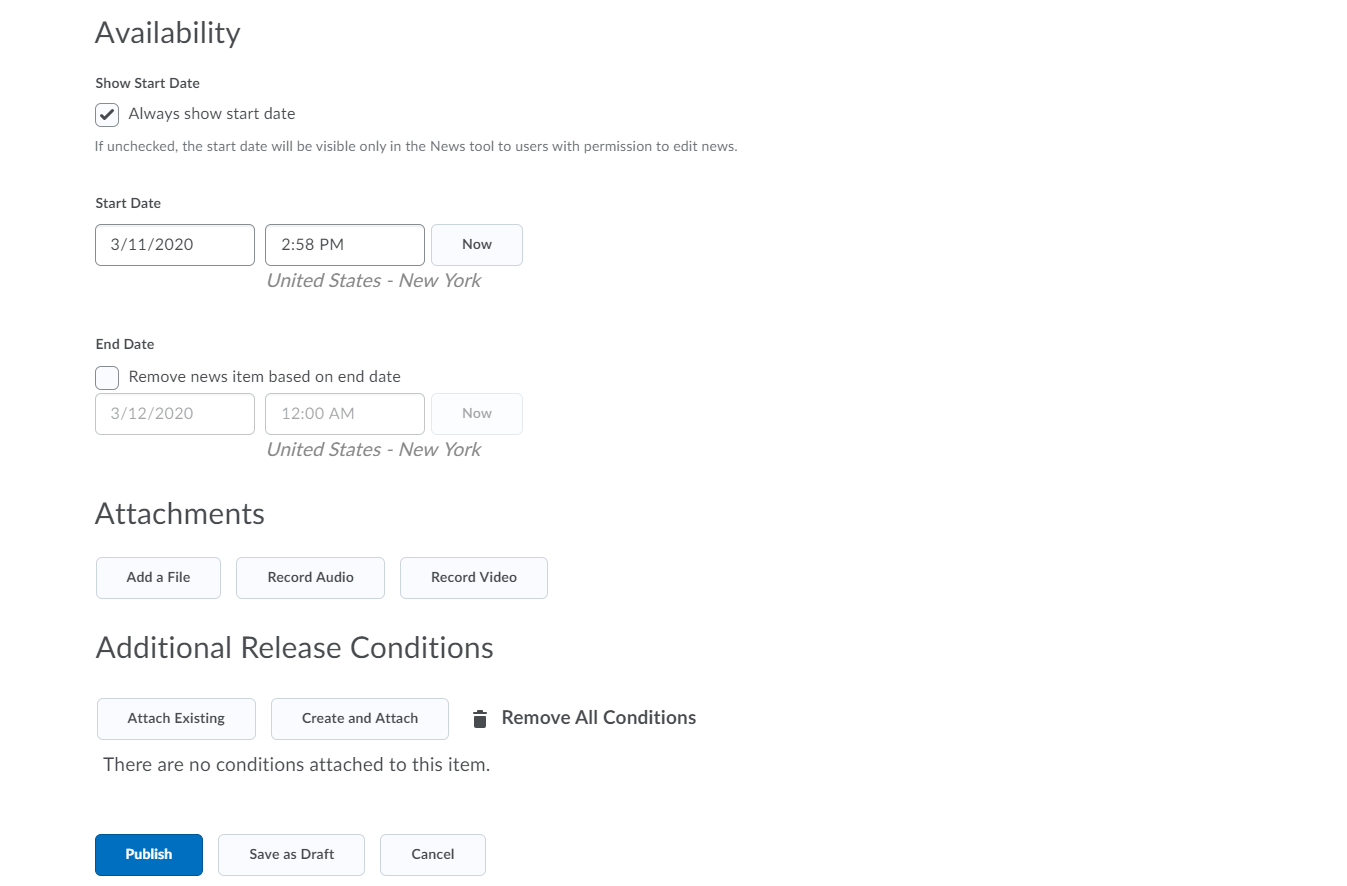
- When you are finished with creating the news item, click the Publish button. Your news item will then be saved.
2. Complete Syllabus
A.Open your Syllabus in Microsoft Word or preferred word processor.
B. Click File, Then Save As.
C. Choose the location you wish to save the file, then click browse.
D. Name your file appropriately.
E. Below the Name As box, select Save as Type: PDF (*.pdf)
3. Upload Syllabus
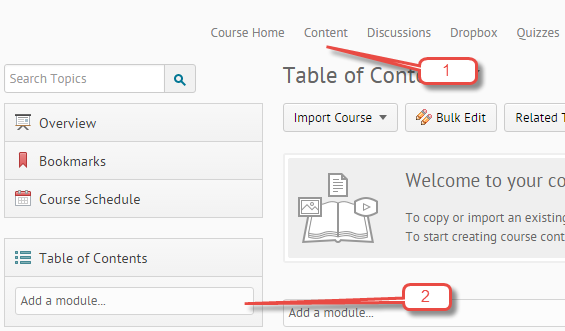
A. In your Brightspace course, navigate to Content, and then Add a module…
B. In the Add a Module… field, type "Syllabus" and press Enter on the keyboard.
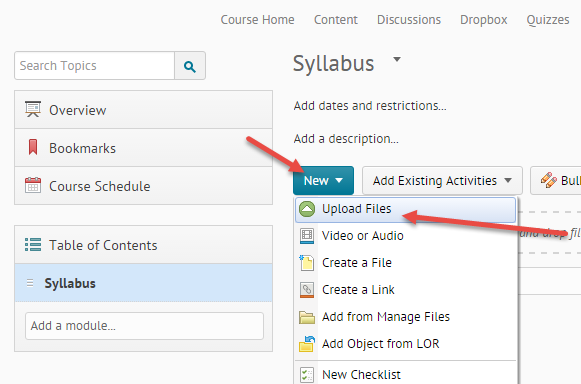
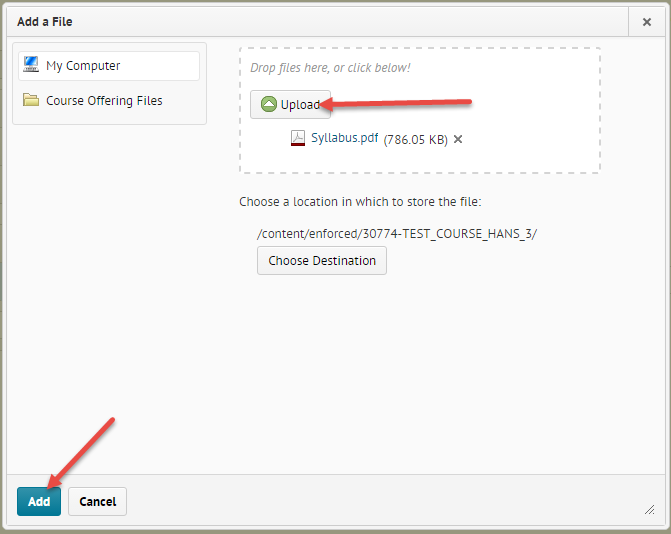
C. Click on the Syllabus module, click New and select Upload Files.
D. Choose your file by clicking Upload, and then Add, to place it in the module.
4. Create Course Navigation
Create course navigation structure by creating modules/sub modules for each unit, week or lesson. The course navigation structure can be organized into weeks, lessons/units or chapters. Use the most logical structure for your teaching needs (the picture below is using “Weeks”).
A. Navigate to Content
B. On the Table of Contents page, enter your new module title in the Add a module... field, which is below the Table of Contents title and any existing modules.
C. Press Enter.
D. Repeat as needed for all modules and submodules.

5. Create Gradebook
A. Click on Grades.
B. Click the Setup Wizard. Brightspace will show you the current/default settings for your gradebook.

C. Click Start. You will be presented with a 7-step process for configuring your gradebook. Click the help icon (question mark) next to each of the options for each step to configure the gradebook according to your needs. These are our suggested settings;
- Step 1; Weighted
- Step 2; Calculated Final Grade
- Step 3; Drop ungraded items, Auto keep final grade updated
- Step 4; Percentage
- Step 5; Number of decimal places to display 2
- Step 6; As shown;
- Step 7; Review summary
- Click Finish

6. Create Gradebook Categories
Create gradebook categories with proper percentages (if weighted calculation);
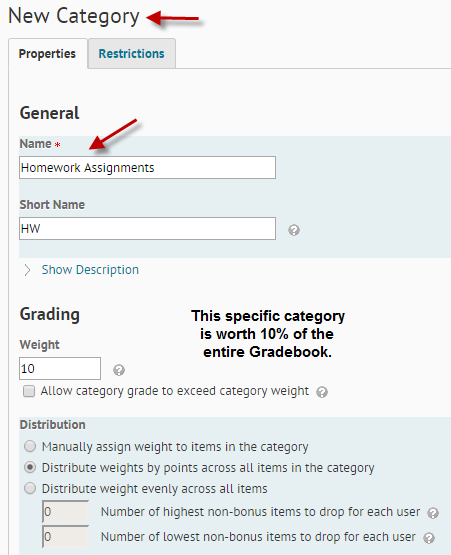
A. On the Manage Grades page, click New, then Catgory.

B. Enter a Name for the category.
C. If needed, enter a Short Name to display in the grade book.
D. If needed, enter a Description of the category. Select the Allow
users to view description check box if you want to make the category description available to users.
E. Enter the total weight or percentage that you want the category to contribute towards the final grade total of 100%.
F. If needed, set Distribution Options as required by your calculations for the category. Check these closely as they will effect each item contributing to the category.
G. If needed, set display options for the students.
H. Click Save and Close. To create another category, click Save and New.
7. Create Gradebook Items
Gradebook Items – there are 2 ways to enter Grade Items
NOTE: There are two ways to enter Items in the Gradebook. The first way, designated ‘I.’, is to manually create placeholder Grade Items in the Gradebook that you’ll manually grade. An example of this is Participation. The second way, and also the recommended way, designated ‘II.’, is to connect the Content Items such as Dropboxes, Discussion Forums, and Quizzes to the Gradebook when creating them.
I. Manually create gradebook items for each graded assessment in the course, e.g. dropbox, quiz, discussion topic;
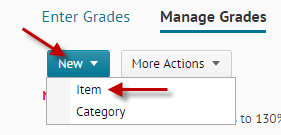
A. On the Manage Grades page, click Item from the New button.
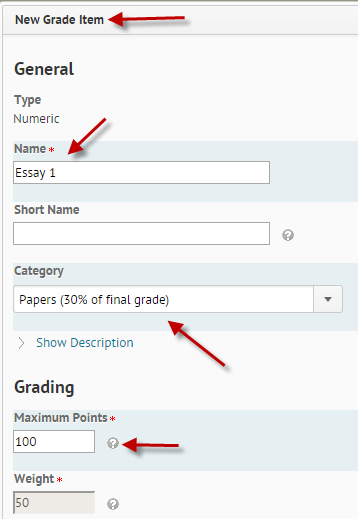
B. Click Numeric.
C. Enter a Name for the grade item.
D. If needed, enter a Short Name to display in the grade book.
E. Select the appropriate category from the Category drop-down list (if you’re using categories for weighting).
F. If needed, enter a Description of the grade item. If you want to make the description available to users, select Allow users to view grade item description.
G. Enter the point value of the item graded in the Maximum Points field.
H. If the Distribution Options in 4F above are set to “Manually assign weight to items in the category”, enter the Weight you want the grade item to contribute to the category. If the item is not weighted, leave this box blank. Brightspace will calculate according to the Maximum Points in 5G above.
I. If you want users’ grades to exceed the total value of the item, select the Can Exceed check box.
J. Select the Bonus check box if you want the item counted as a bonus item.

II. Connect Content Items to the Gradebook when creating them (Dropbox Example);
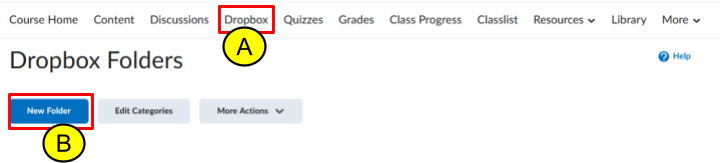
A.) Click on Dropbox.
B.) On the Dropbox Folders page, click New Folder.

C.) Name the Dropbox and make any other needed option changes (ignore Category field).
D.) Next to Grade Item, select New Grade Item.
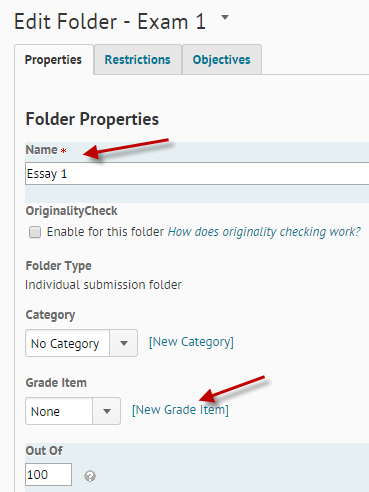
E.) In the new pop up screen, name the Grade Item the same name as the Content Item.
F.) If needed, associate the newly created Grade Item with the relevant Category in the pop up window.
G.) Click Save to save the Grade Item settings and Save and Close the newly made dropbox. To verify that the grade item has been created, go to Resources, Grades, Manage Grades, and find the new grade item in the gradebook.
8. Create Dropboxes
Connect Content Items to the Gradebook when creating them (Dropbox Example);
A. Click on Dropbox.
B. On the Dropbox Folders page, click New Folder.
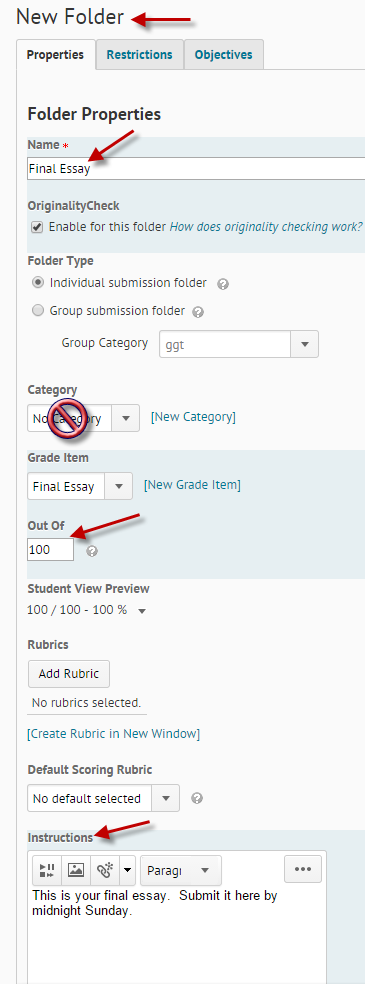
C. Enter a Name.
D. Select a Folder Type:
- Individual submission folder Select this option if you want each user to have their own submission.
- Group submission folder Select this option if you want one submission per group. You must associate the folder with a Group Category. NOTE: Group submission areas are marked on the Dropbox Folders page with the Group Submissions icon. Any group member can submit and view files for a group dropbox folder.
E. Ignore the Category drop-down list for now.
F. Associate the dropbox folder with a Grade Item to tie the item to the Gradebook.
G. Enter a value in the Out Of field for the assignment total score. TIP: If you associate the folder with a grade item, maintain consistency for your students by matching the value of the Out Of field to the grade item's Max. Points value.
H. If you associate the dropbox folder with a grade item, you can click Edit Display Settings from the Student View Preview context menu to edit how grades display to students.
I. Ignore Add Rubric for now.
J. Add Instructions for students.
K. You can include attachments such as a file, an audio recording, or a video recording.
L. Select the submission options you want.
M. Click Save.
9. Create Overall Discussion Forum
Create one overall discussion forum. This forum will contain all of your discussion "topics" for the course and is required ;
A. Click on Discussions.
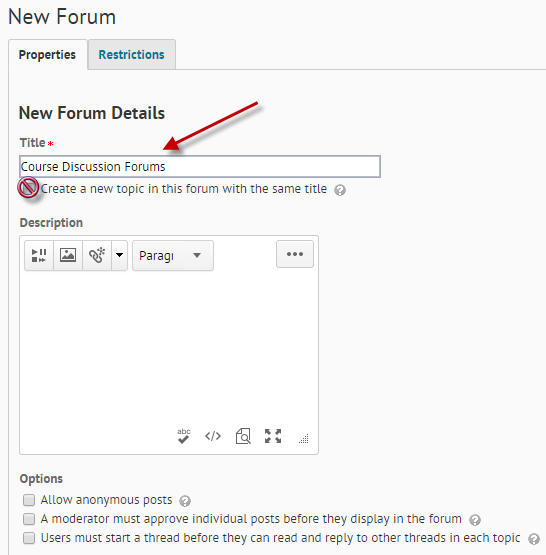
B. On the Discussions List page, click New and then New Forum.

C. Enter the title Course Discussion Forums for your forum.
D. Do not select the Create a new topic in this forum with the same title check box.
E. Leave all settings and release conditions for the overall discussion forum as is.
F. Click Save and Close.
10. Create Discussion Topics
Create and configure all discussion topics
A. On the Discussions List page, click New Topic from the New button.

B. Select “Course Discussion Forums” as the forum you want to place your topic in from the drop-down list.
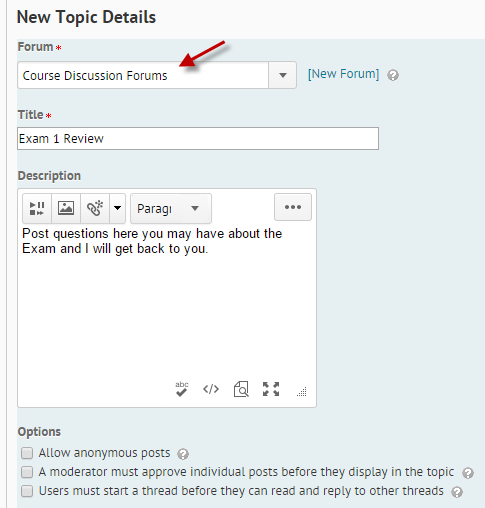
C. Enter a Title and Description for your topic.
D. In the Options section, if needed:
- Select the Allow anonymous posts check box to enable anonymous posting to the topic. NOTE: You cannot evaluate anonymous posts.
- Select the A moderator must approve individual posts before they display in the forum check box to require moderators approve posts before they appear in the topic.
- Select the Users must start a thread before they can read and reply to other threads check box if you want users to start a thread before they can read and respond to other threads in the topic.
E. Ignore the rating scheme for now.
F. Select a Visibility option for your topic. NOTE: Most instructors leave the visibility and locking options open to all students for the entire semester. NOTE: If you select Topic is visible for a specific date range, select the Has Start Date and Has End Date check boxes to set your availability. You can also have dates Display in Calendar.

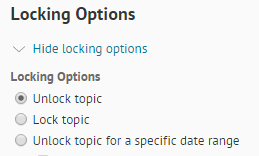
G. Select topic Locking Options:
- Select Lock topic to the lock the forum when it is created. It remains locked until you select Unlock topic.
- Select Unlock topic for a specific date range to open the topic within a date range. Select the Has Start Date and Has End Date check boxes to set your topic availability.
H. Click Save and Close or Save and New.
11. Link Discussions, Dropboxes, and Quizzes to Content Area
Link all Content Items to their respective Modules in the Content Area (Dropbox Example);
A. Navigate to Content, and select the Module to add the dropbox to.
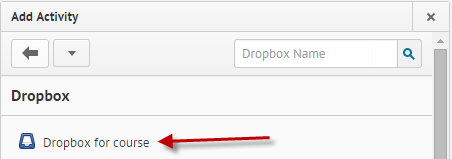
B. Select Add Existing Activities and then Dropbox.
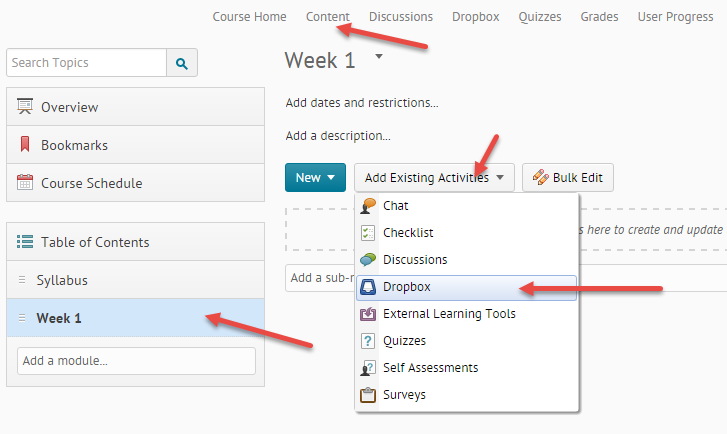
C. In the pop up window, click the drop box you want to add to the selected module.
D. It is now linked to the module, as shown.

12. Link Files, Videos, or Web Links
Link any files, videos or external web links to their respective modules using the New button/tool. These items typically come from outside of Brightspace initially –
A. With the desired module selected, click the New button.
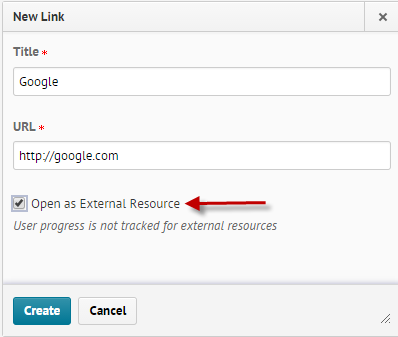
B. Click on Create a Link
C. Enter a title for the link
D. Paste the URL for the link into the URL box
E. Check Open as External Resource
F. Click Create
13. Preview as Student
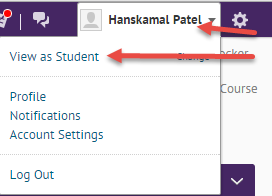
Preview everything as the role of “student” click on your name on the top right and click on “View as Student”.
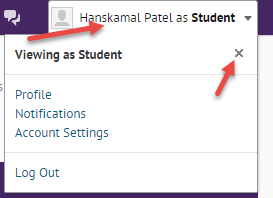
To switch the role back to Instructor, click on your name on the top right corner and click the “X” button.
14. Create Rubrics
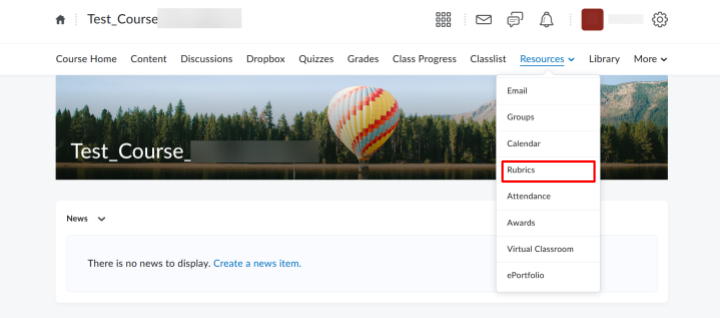
- Accessing the rubric menu
- From the Resources dropdown on the navigation bar, select Rubrics
- From the Resources dropdown on the navigation bar, select Rubrics
- Creating a rubric
- Locate the rubrics menu using the steps above
- Press the create new rubric button to enter the rubric menu
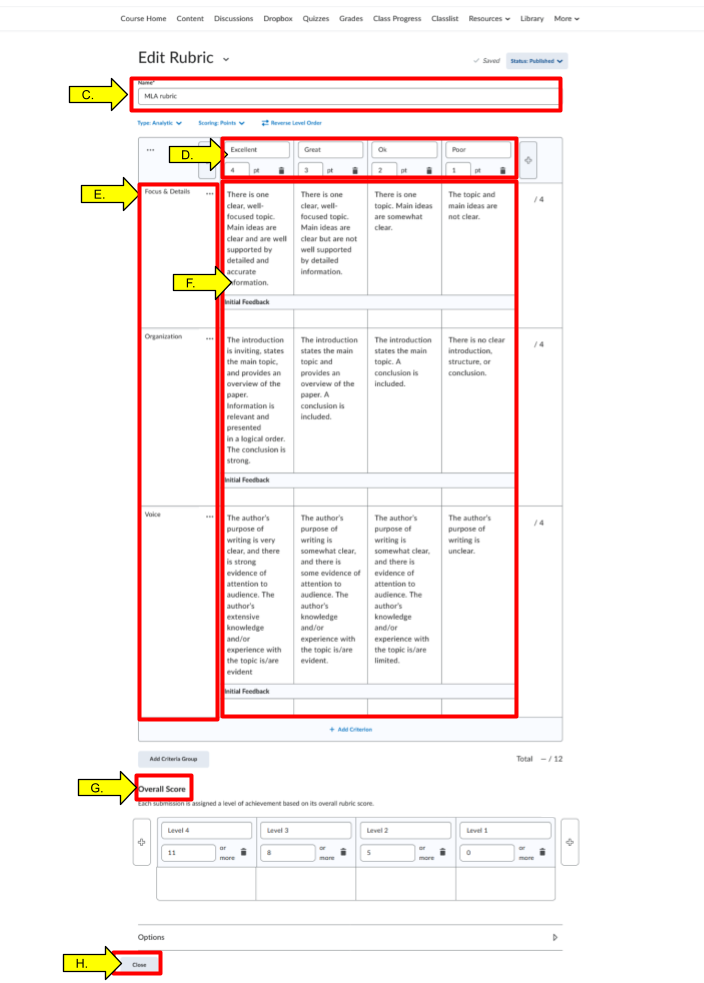
- Once in the rubric menu enter a name for your new rubric
- For the most flexibility, choose an Analytic and Custom Points type rubric
- Fill out the levels and point values for each rubric option. The highest point value times the number of categories should equal the total number of points for the assignment.
- Click on the name of the category to make an editor box appear and allow you to change the name
- Fill out the rubric option with each rubric value. The initial feedback box can be left blank
- Ignore the Overall Score section as it is out of the scope of this tutorial and is not required
- Press close to close the rubric (rubrics are automatically saved)
- Linking a rubric to an existing dropbox
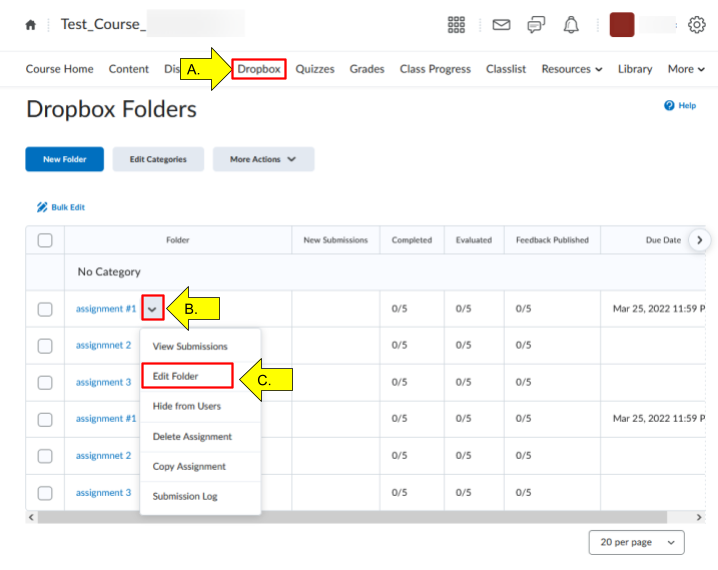
- Go to dropbox tab for your Brightspace course
- Click the
 next to the dropbox folder you wish to map the rubric to
 - Select Edit Folder from the list of options
- You should now be in the dropbox editor menu. This should be the same menu that you saw when you were creating the dropbox
- In the dropbox editor menu go to the right sidebar on the screen and click the dropdown for Evaluation and feedback
- Click
 in the Evaluation and feedback box
 - Click Add Existing from the dropdown
- Select your rubric from the list of rubrics
- Click Add Selected
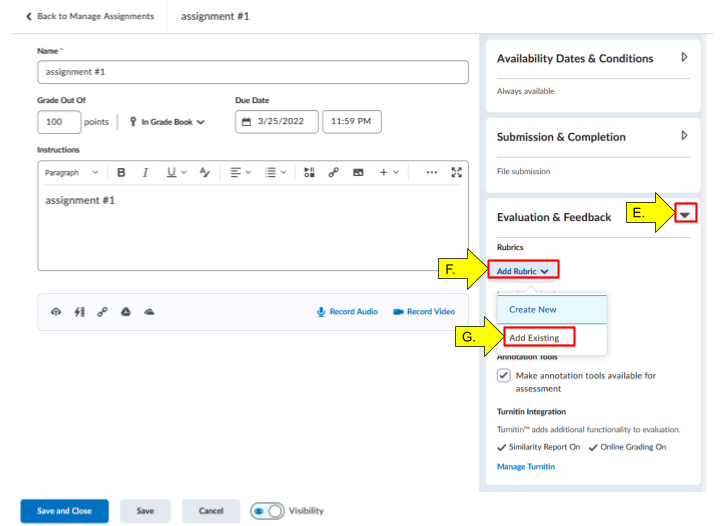
- Press the Save and Close button at the bottom of the dropbox editor

15. Create Quizzes
- Creating a Quiz with basic settings
- Click the quizzes section of your course page
- Click the new quiz option
Not in Gradebook
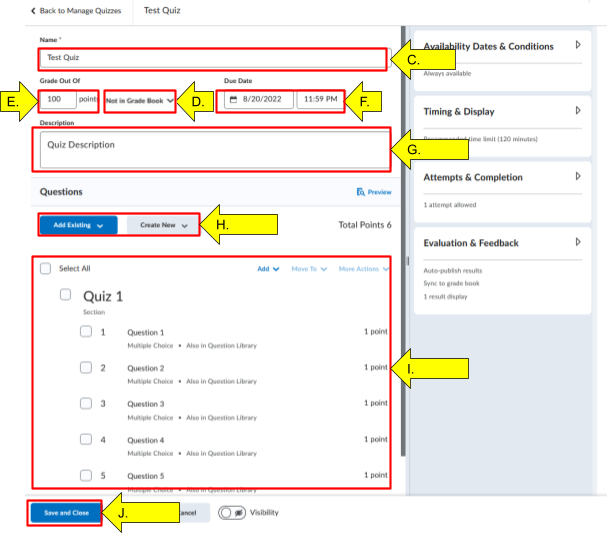
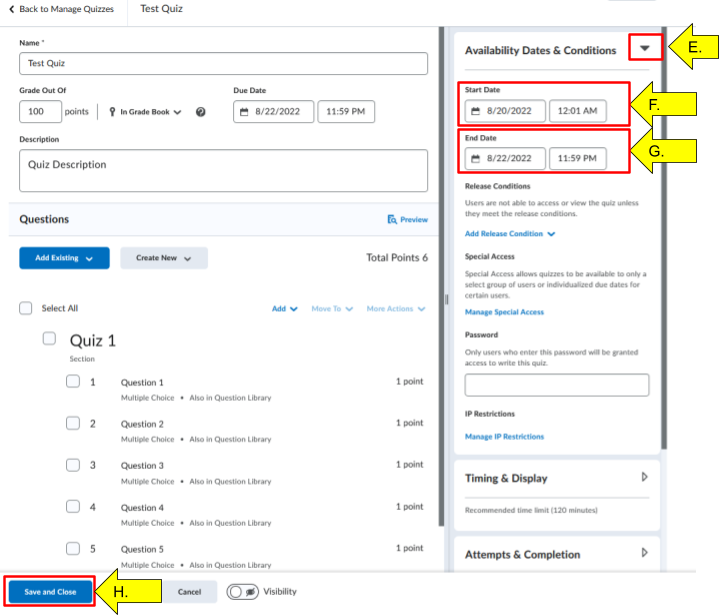
- Replace Untitled with the name for your newly created quiz
- Click the Not in Gradebook dropdown and click Add to Gradebook
- Alternatively if you have already created a gradebook item you can click Edit or Link to Existing and select the existing gradebook item
- If you don’t want the quiz to appear in your Brightspace gradebook you can leave this option at its default or click the dropdown again and set it to not in gradebook .
- Enter a point value for your newly created quiz
- Select a due date for the quiz. Once you select a date the box to also enter a due time will appear.
- By default the quiz will be invisible to students until you adjust the visibility slider or a date for it to become visible.
- Fill out a description of the quiz in the description box
- Add questions to your quiz either using the Add Existing or Create New button.
- Brightspace provides many different options when importing questions; question banks, shuffling questions, preventing students from backtracking and pre page delivery. Please consult with CTE if you have any questions or concerns.
- Confirm that your questions have been imported correctly.
- For this example the question names “Question 1”, “Question 2” etc are used. When you actually import/create your own questions they will be the questions themselves
- You can modify a question by clicking on the question and changing its options in the editor
- Click the save and close button at the bottom of the screen
- Modifying visibility of quizzes
- Click the quizzes section when inside of your course
- Click the carrot next to the quiz you want to modify
- If you just want to make the quiz visible now just select the Make Visible to Users option
- This will make the quiz visible to all students when clicked
- Useful if you are taking the quiz in class and want to start it when everyones ready
- If you want the quiz to appear at a specific time click the Edit button

- Expand the Availability Dates & Conditions dropdown from the sidebar
- Adjust the start date to when you want your students to be able to start the exam
- Adjust the end date to when you want the exam to no longer be visible
- Click save and close at the bottom of the screen
- Manually adding questions to your quiz
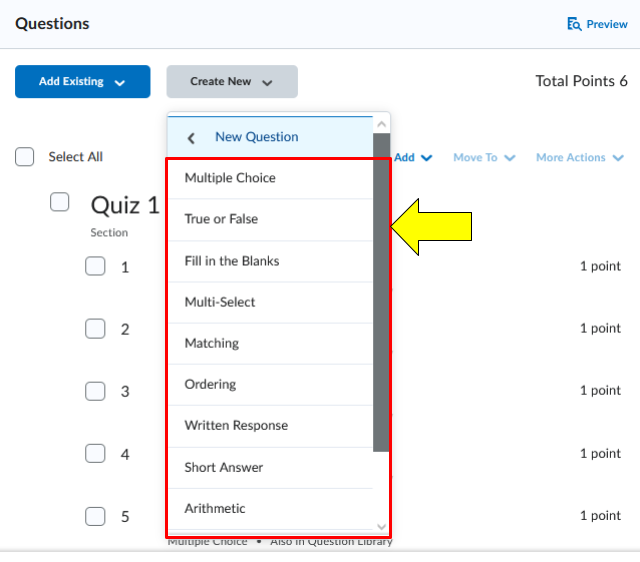
- When in the quiz creation menu click Create New under question options

- From the dropdown select New Question

- Select the question type from the list available (for this example we are selecting multiple choice)
- Fill in the options for the newly created question
- Click the bubble next to the answer you want to mark as correct
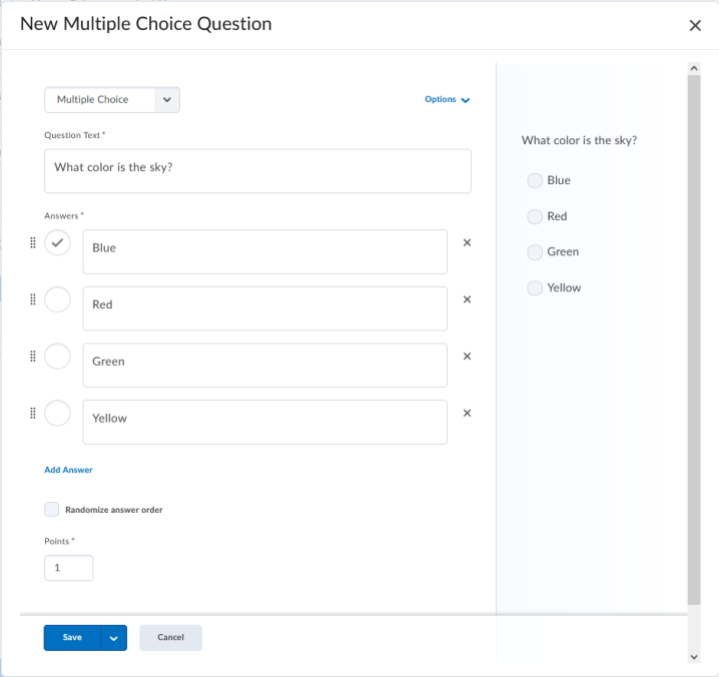
- Click the bubble next to the answer you want to mark as correct
- When done click Save at the bottom of the question creation tool
- When you are done adding all of your questions and modifying your quiz options click the Save and Close button at the bottom of the quiz editing tool.
- When in the quiz creation menu click Create New under question options